Symfony 4 and the API Platform Framework make it easy to create an API application with basic CRUD operations. However, in real-world applications more advanced features (e.g. authentication and custom endpoints) are needed which require quite a bit of knowledge to set-up. Therefore, in this blog article, we explore these advanced features by creating an example application that covers the following topics:
- Step 1. Installation of API Platform and the EasyAdminBundle
- Step 2. Creation of entities
- Step 3. Making of demo content with DataFixtures
- Step 4. Authentication with HTTP passwords
- Step 5. Authentication with an API token
- Step 6. Creation of custom API endpoints
- Step 7. Functional smoke tests including security
I hope this article helps to reduce the time necessary to set up your own Symfony 4 API application. The example application is hosted on GitHub:
https://github.com/nielsvandermolen/example_symfony4_api/
Each step in the blog article has a own commit in the repository. For readability sake, the full source code is not included in the article but we only highlight the important parts.
Step 1. Setting up the Symfony project
We use Docker to setup the application. Please read the related blog article for the reasons why to use Docker. Please look at commit 9c5b1e9 for the necessary files. Now, when we start the Docker containers with docker-compose up -d and go to the IP of the machine that is running Docker with port 8001 (in my case localhost:8001) you should see an error: "File not found" .
This is because we did not install Symfony. Let’s fix that issue by going into the Docker fpm (PHP) container and use Composer to install Symfony 4 in the project folder.
1 2 3 4 | docker exec -it example_symfony4_api_fpm_1 bash # Get an interactive bash shell in the fpm container composer create-project symfony/skeleton . # Install Symfony 4 in the project directory composer req api admin security # Install the api-pack and easyadmin-bundle composer req maker test profiler orm-fixtures --dev # Install various development packages for developing, debugging and testing. |
This results in a Symfony application with all the dependencies installed. For a detailed look on what is installed check the composer.json and composer.lock files.
Step 2. Let’s create some entities
The example application consists of an article entity with comments linked to it. Let’s create the Comment entity in the Docker container with Symfony Maker:
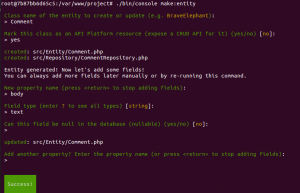
Next, we create the Article entity and create the relationship to the Comment entity:
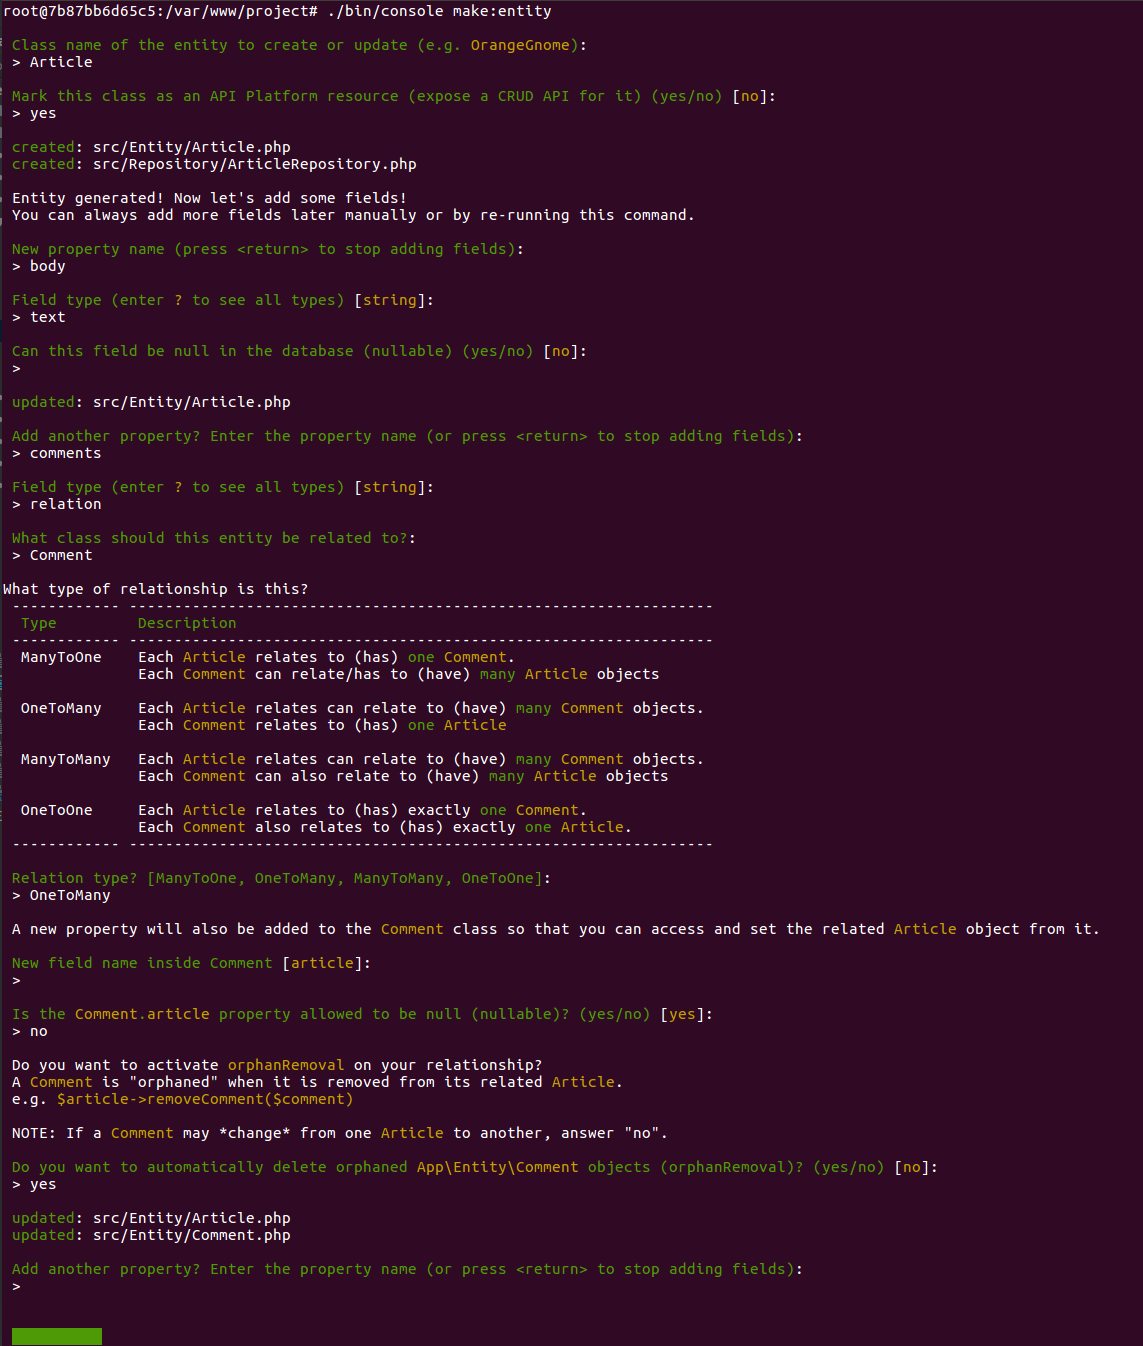
This should give you the two entities in project/src/Entity/:
Since we want to use these ids in other applications we do want to change the id fields of the entities to use the Doctrine UUID instead of the default auto incremental ID.
1 2 3 4 5 6 | /** * @ORM\Id() * @ORM\GeneratedValue(strategy="UUID") * @ORM\Column(type="guid", unique=true) */ private $id; |
Furthermore, in order to use the admin interface we want to implement the __toString methods for both entities:
1 2 3 4 | public function __toString() { return (string) $this->getId(); } |
Now, it is time to add some configuration. First, we have to change the DATABASE_URL environment variable in the project/.env file to mysql://root:root@db:3306/project_db. Then we want to change the project/config/packages/easy_admin.yaml file to include our new entities:
1 2 3 4 | easy_admin: entities: - App\Entity\Article - App\Entity\Comment |
Finally, it is time to create the database:
1 2 | ./bin/console doctrine:database:create ./bin/console doctrine:schema:update --force |
Now, we should have a fully functional admin interface on localhost:8001/admin and a working CRUD API for the entities with documentation on localhost:8001/api
Step 3. Doctrine data fixtures
To speed up development and have some content for our automated tests it is a good practice to write a DataFixture. First, create an initial class with ./bin/console make:fixtures and call it AppFixtures. In project/src/DataFixtures/AppFixtures.php we can create some articles with comments on them:
1 2 3 4 5 6 7 8 9 10 11 12 13 14 15 16 17 18 19 20 21 | // /project/src/DataFixtures/AppFixtures.php class AppFixtures extends Fixture { public function load(ObjectManager $manager) { for ($i = 0; $i < 10; $i++) { $article = new Article(); $article->setBody('This is a body of article ' . $i); for ($i2= 0; $i2 < $i; $i2++) { $comment = new Comment(); $comment->setBody('This is the body of comment ' . $i2 . ' of article ' . $i); $comment->setArticle($article); $manager->persist($comment); } $manager->persist($article); } $manager->flush(); } } |
The content in the Datafixture will replace the content in the current database when calling: ./bin/console doctrine:fixtures:load -n
Step 4. Making the application secure – HTTP password
Currently, there is no security applied in the Symfony application and anyone that can access the server can create and delete entities. The easiest method to make the application secure is to add an HTTP password by creating an in_memory user provider in the projects/config/packages/security.yaml:
1 2 3 4 5 6 7 8 9 10 11 12 13 14 15 16 17 18 19 20 21 22 23 24 | security: providers: in_memory: memory: users: admin: password: $2y$12$LhoRWwnWimLqBjFeXOD59ObHQlALhaZh2pqkGzzTIrXeFZs/ltSju roles: 'ROLE_ADMIN' role_hierarchy: ROLE_ADMIN: [ROLE_API] firewalls: dev: pattern: ^/(_(profiler|wdt)|css|images|js)/ security: false main: http_basic: true provider: in_memory access_control: - { path: ^/api/, roles: ROLE_API } - { path: ^/admin/, roles: ROLE_ADMIN } encoders: Symfony\Component\Security\Core\User\User: algorithm: bcrypt cost: 12 |
The encrypted passwords can be generated with ./bin/console security:encode-password. Now, the application should be behind an HTTP password in this case: admin/admin.
Step 5. Making the application secure – Token authentication
However, we do not want to have to use an HTTP password to make a request to an API. Therefore, we want to use an authentication token that gets sent in with every request. In the example application, we follow the tutorial by Symfony where they use the Symfony Guard authentication system. The full commit for the implementation of the token authentication step is 46866ac.
The security.yaml file has these changed added:
1 2 3 4 5 6 7 8 9 10 11 12 13 14 15 16 | #... providers: user_db_provider: entity: class: App\Entity\User property: apiKey # ... firewalls: # ... api: pattern: ^/api/ guard: authenticators: - App\Security\TokenAuthenticator provider: user_db_provider #... |
A new User entity has to be created with make:entity which we do not expose with the API but we do want to add it to the easy_admin.yaml file and to the DataFixture. Furthermore, after creating the fixture for the entity you have to update the database again with doctrine:fixtures:load -n
1 2 3 4 5 6 7 8 9 10 11 12 13 14 15 16 17 18 19 20 21 22 23 24 25 26 27 28 29 30 31 32 33 34 35 36 37 38 39 | // project/src/Entity/User. /** * @ORM\Table(name="app_users") * @ORM\Entity(repositoryClass="App\Repository\UserRepository") */ class User implements UserInterface, \Serializable { /** * @ORM\Id * @ORM\Column(type="guid", unique=true) * @ORM\GeneratedValue(strategy="UUID") */ private $id; /** * @ORM\Column(type="string", length=64, unique=true)) */ private $apiKey; /** * @ORM\Column(type="string", length=25) */ private $username; /** * @ORM\Column(type="string", length=64) */ private $password; public function getRoles() { return array('ROLE_API'); } public function eraseCredentials() { } // .. Other getters and setters } |
1 2 3 4 5 6 7 8 9 | // project/src/DataFixtures/AppFixtures.php public function load(ObjectManager $manager) { $user = new User(); $user->setApiKey('test_api_key'); $user->setUsername('test'); $user->setPassword('test'); $manager->persist($user); ... |
1 2 3 4 5 6 | # project/config/packages/easy_admin.yaml easy_admin: entities: - App\Entity\Article - App\Entity\Comment - App\Entity\User |
Another useful step is to add this Swagger configuration so we can use the token authentication in the API documentation. You do have to remove the role_hierarchy of the admin role or change the security configuration in order to test it with the documentation. However, it does already improve the documentation by adding the header correctly to the curl commands.
1 2 3 4 5 6 7 8 | api_platform: mapping: paths: ['%kernel.project_dir%/src/Entity'] swagger: api_keys: apiKey: name: X-AUTH-TOKEN type: header |
You can test the authentication by using curl on an endpoint and setting the token in the request header:
1 | curl -X GET "http://localhost:8001/api/articles" -H "accept: application/json" -H "X-AUTH-TOKEN: test_api_key" |
Step 6. Custom API endpoints
API Platform uses the concept of operations for creating API endpoints and there are various methods for defining custom operations. The native Symfony controller method seems to work most intuitively so that is the one that we use. First, let’s create a new service that counts the number of comments on an article:
1 2 3 4 5 6 7 8 9 | // project/src/Service/ArticleService.php use App\Entity\Article; class ArticleService { public function countCommentsinArticle(Article $article) { $count = $article->getComments()->count(); return $count; } } |
Now, we want to create a Symfony controller with make:controller and create a method that calls the service and maps it to the API operation:
1 2 3 4 5 6 7 8 9 10 11 12 13 14 15 16 17 18 19 20 21 22 | class ArticleController extends Controller { /** * @Route( * name="count_articles", * path="api/article/{id}/count", * methods={"GET"}, * defaults={ * "_controller"="\App\Controller\ArticleController::countCommentsinArticle", * "_api_resource_class"="App\Entity\Article", * "_api_item_operation_name"="countCommentsinArticle" * } * ) */ public function countCommentsinArticle(Article $data, ArticleService $articleService) { $commentCount = $articleService->countCommentsinArticle($data); return $this->json([ 'id' => $data->getId(), 'comments_count' => $commentCount, ]); } } |
The last step is to make the operations explicit on the Article entity annotations and add the Swagger documentation:
1 2 3 4 5 6 7 8 9 10 11 12 13 14 15 16 17 18 19 20 21 22 23 24 25 26 27 28 29 | /** * @ApiResource( * itemOperations={ * "get"={"method"="GET"}, * "put"={"method"="PUT"}, * "delete"={"method"="DELETE"}, * "countCommentsinArticle"={ * "route_name"="count_articles", * "swagger_context" = { * "parameters" = { * { * "name" = "id", * "in" = "path", * "required" = "true", * "type" = "string" * } * }, * "responses" = { * "200" = { * "description" = "The Comment count has been returned in the response" * } * } * } * } * } * ) * @ORM\Entity(repositoryClass="App\Repository\ArticleRepository") */ class Article |
That’s it! Now the custom API endpoint should show up on the API documentation page (localhost:8001/api) and you should be able to use the endpoint by using the UUID of an article e.g.:
1 | curl -X GET "http://localhost:8001/api/article/a389eb11-6d9d-11e8-bc52-0242ac130004/count" -H "accept: application/json" -H "X-AUTH-TOKEN: test_api_key" |
Step 7. Automated testing
It is always a good idea to write some smoke test for your PHP application because they are very easy to write and they provide feedback if your application is still “compiling” and that it is secure.
First, we add a new security HTTP password for the test environment:
1 2 3 4 5 6 7 8 9 | // project/config/packages/test/security.yaml security: providers: in_memory: memory: users: test: password: $2y$12$1sZXPUAuyLv5PSWigKfjMOtczuaB.nNG7Kou5st6blZ2UB9KBtpy6 roles: 'ROLE_ADMIN' |
Then we can add our tests:
1 2 3 4 5 6 7 8 9 10 11 12 13 14 15 16 17 18 19 20 21 22 23 24 25 26 27 28 29 30 31 32 33 34 35 36 37 38 39 40 41 42 43 44 45 46 47 48 49 50 51 52 53 54 55 56 57 58 59 | // project/tests/SmokeFunctionalTest.php use Symfony\Bundle\FrameworkBundle\Test\WebTestCase; class SmokeFunctionalTest extends WebTestCase { /** * @dataProvider urlProvider */ public function testPageIsSecure($url) { $client = self::createClient([], [ 'PHP_AUTH_USER' => 'test', 'PHP_AUTH_PW' => 'incorrect_pw', ]); $client->request('GET', $url); $this->assertFalse($client->getResponse()->isSuccessful()); } /** * @dataProvider urlProvider */ public function testPageIsSuccessful($url) { $client = self::createClient([], [ 'PHP_AUTH_USER' => 'test', 'PHP_AUTH_PW' => 'test', ]); $client->request('GET', $url); $this->assertTrue($client->getResponse()->isSuccessful()); } public function urlProvider() { yield ['/api']; yield ['/admin/?entity=Article']; yield ['/admin/?entity=Comment']; yield ['/admin/?entity=User']; } /** * @dataProvider urlApiProvider */ public function testAPIisSecure($url) { $client = self::createClient([]); $client->request('GET', $url, [], [], ['HTTP_X_AUTH_TOKEN' => 'incorrect_api_key', 'HTTP_ACCEPT' => 'application/json']); $this->assertFalse($client->getResponse()->isSuccessful()); } /** * @dataProvider urlApiProvider */ public function testAPIWorks($url) { $client = self::createClient([]); $client->request('GET', $url, [], [], ['HTTP_X_AUTH_TOKEN' => 'test_api_key', 'HTTP_ACCEPT' => 'application/json']); $this->assertTrue($client->getResponse()->isSuccessful()); } public function urlApiProvider() { yield ['/api/articles']; yield ['/api/comments']; } } |
Before we can run the tests we need to add some environment variables to the phpunit.xml.dist file:
1 2 3 4 5 6 | <php> ... <env name="CORS_ALLOW_ORIGIN" value="^http://localhost:?[0-9]*$" /> <env name="DATABASE_URL" value="mysql://root:root@db:3306/environments" /> ... </php> |
There we go, we can now execute the PHPUnit tests in the Docker container with:
1 | ./bin/phpunit |
Discussion
Congratulations for making it to the end of the article as it had a high density of concepts which were not explained in a detailed matter. For some topics, it is most educative to see a collection of opinionated code that works. We have just touched the basics on what is possible with Symfony and the API Platform Framework we hope this will give you a headstart in developing your API application. I am in the middle of learning to develop with these technologies as well so please let me know if you think there are better ways to do things and why.
If you learned something from this article please consider leaving a comment, sharing it with your peers or to


20 Comments
nielsvandermolen · June 21, 2018 at 10:39 am
There is a small mistake in Step 6. Custom API endpoints. It is better when the route path starts with api/ for the authentication to work for the custom operations. Updated the article and the repository to resolve this issue.
Mahdy Nasr · December 5, 2018 at 7:05 pm
very amazing tutorial, very descriptive and helpful, many thanks 👍🏻👍🏻
nielsvandermolen · December 7, 2018 at 6:11 pm
Thanks Mahdy!
Vladimir · December 8, 2018 at 2:57 pm
Why we need ArticleService? We can not write this in the controller?:
$data->getComments()->count()
nielsvandermolen · December 10, 2018 at 8:25 am
Yes, you could. The service endpoint is basically a placeholder for your own (more complex) endpoints. When you use multiple entries like an Admin interface and an API it is still valuable in maintenance to put this code in the service instead of repeating it multiple times.
It provides cleaner code when you put all your business logic in services and not in controllers or other places.
naoufal · January 9, 2019 at 2:00 pm
this is very good tutorial thank you!
Dave · January 17, 2019 at 2:56 pm
Where’ve you been all of my life? 😀
Anonymous · January 24, 2019 at 8:11 pm
Thanks a lot. This has made my life a lot easier. Very rich information in a short tutorial
Sean · January 24, 2019 at 8:12 pm
Great work. Very helpful indeed!
nielsvandermolen · January 25, 2019 at 10:10 am
Thanks for the comments, I am glad the tutorial is helpful for this many people.
Anon · March 6, 2019 at 5:44 pm
The php docker file no longer builds:
[Error]
checking for libzip… not found
configure: error: Please reinstall the libzip distribution
ERROR: Service ‘fpm’ failed to build: The command ‘/bin/sh -c apt-get update && apt-get install -y –no-install-recommends git zlib1g-dev libxml2-
dev && docker-php-ext-install pdo_mysql zip’ returned a non-zero code: 1
SlyMachine:symf dev$ docker-compose up -d
Building fpm
Step 1/4 : FROM php:fpm
—> 9343626a0f09
Step 2/4 : RUN apt-get update && apt-get install -y –no-install-recommends git zlib1g-dev libxml2-dev RUN curl -sS https://getcomposer.org/instal
ler | php && mv composer.phar /usr/local/bin/composer
—> Running in 6b6e0d64ebe6
Get:1 http://security-cdn.debian.org/debian-security stretch/updates InRelease [94.3 kB]
Ign:2 http://cdn-fastly.deb.debian.org/debian stretch InRelease
Get:4 http://cdn-fastly.deb.debian.org/debian stretch-updates InRelease [91.0 kB]
Get:3 http://security-cdn.debian.org/debian-security buster/updates InRelease [38.3 kB]
Get:8 http://security-cdn.debian.org/debian-security stretch/updates/main amd64 Packages [476 kB]
Get:5 http://cdn-fastly.deb.debian.org/debian buster InRelease [158 kB]
Get:6 http://cdn-fastly.deb.debian.org/debian buster-updates InRelease [46.8 kB]
Get:7 http://cdn-fastly.deb.debian.org/debian stretch Release [118 kB]
Get:9 http://cdn-fastly.deb.debian.org/debian stretch-updates/main amd64 Packages [11.1 kB]
Get:10 http://cdn-fastly.deb.debian.org/debian buster/main amd64 Packages [7966 kB]
Get:11 http://cdn-fastly.deb.debian.org/debian stretch Release.gpg [2434 B]
Get:12 http://cdn-fastly.deb.debian.org/debian stretch/main amd64 Packages [7084 kB]
Fetched 16.1 MB in 8s (1857 kB/s)
Reading package lists…
E: Command line option ‘S’ [from -sS] is not understood in combination with the other options.
mv: cannot stat ‘composer.phar’: No such file or directory
ERROR: Service ‘fpm’ failed to build: The command ‘/bin/sh -c apt-get update && apt-get install -y –no-install-recommends git zlib1g-dev libxml2-
dev RUN curl -sS https://getcomposer.org/installer | php && mv composer.phar /usr/local/bin/composer’ returned a non-zero code: 1
nielsvandermolen · March 7, 2019 at 8:54 pm
You can try to add the libzip-dev package.
https://github.com/nielsvandermolen/example-symfony-messenger/issues/1
Why hide text · May 18, 2019 at 11:46 am
The tutorial is interesting and good, but you should think a few hours about tthe meaning of CONTRAST – it is a very usable thing and it helps to make things readable. There are some important parts in this tutorial that are NOT easily readable because there is nearly no CONTRAST – grey text on black background is a good example of how to punish your readers. Please take a look at https://www.contrastrebellion.com/ to lern some basic things about how important contrast is to make text readable.
No this is not about personal taste – text also has a function, and all creative things should respect that functions. Good, well educated desigenrs understand that, and using good contrast is a good tool to recognize the quality of a designer.
BTW also the text on your main blog page suffers from a lack of contrast.
nielsvandermolen · May 18, 2019 at 7:39 pm
Thanks for the feedback, the contrast of the code should now be better. Also increased the font size!
Olga · May 19, 2019 at 11:24 pm
Yes, the Tutorial is fine, but by using docker we inherit a few problems that would not exist without it.
First, the PostgreSQL DB in the docker setup of openapi-platform did not contain the uuid-ossp extension, which seems to be needed, so we have to manually install that otherwise the uuid will not be generated by fixtures.
Also trying to generate the fixtures we get this fantastic error:
cURL error 6: Could not resolve host: cache-proxy
we are not alone, see
https://github.com/api-platform/api-platform/issues/682
this is a nice example how docker complicates a setup very quickly – now you have to dive deep into why that cache-proxy is not found in the docker network. Fun! Yes, of course we will find a fix, but we wanted to do something else than fixing docker setups…
Leonardo Cuquejo · June 1, 2019 at 1:11 pm
Great Tutorial, Now I have JWT working in my system!
Just one question. If I have the token all works fine, but I didn’t find a route to get the token from a user/pass.
You know, like my frontend should have a login page, after submitting the user and pass will receive the token for this user.
How to do that?
nielsvandermolen · June 2, 2019 at 7:54 pm
Thanks, there is a feature for that in Symfony by using json_login.
https://api-platform.com/docs/core/jwt/
I recommend you subscribe to this API Platform (paid) course in which Ryan and I describe this with an example (it will likely be around 18. which will be released soonish).
https://symfonycasts.com/screencast/api-platform
sam tion · June 17, 2019 at 5:10 pm
In the time it took you to explain the reasons to use docker and how to configure it to get started before even getting into symfony, I can have a LAMP stack up and running on a VPS from a premade image. Just saying. Docker is a tool but it is not always the best way to go for everyone. That is probably why symfony doesn’t even mention it.
Mohamad Yusuf Ibrahim · August 28, 2019 at 5:58 am
wow, looks so great… will try this tutorial this night
Nik · October 14, 2019 at 12:35 pm
Thank you for one of the most useful articles I’ve ever read.
By the way, if you got an error: “An exception has been thrown during the rendering of a template (“Notice: A non well formed numeric value encountered”).” check the type returned by method `getId` in entity file: `src/entity/Article.php`:
It should be:
“`
public function getId(): ?string
{
return $this->id;
}
“`
instead of:
“`
public function getId(): ?int
{
return $this->id;
}
“`