Running tasks asynchronous is becoming vital for any large web application. An example, on which I worked, is a Facebook-like activity stream for Open Social (Drupal 8). Imagine that a personal notification based on a relation, rank, and gender has to be generated for millions of users when an event happens. Pretty complex right? Now, imagine the messages to have to be aggregated (e.g., messages like there are 5 new comments on your posts).
It would cause a significant performance drop when the personalized messages need to be built on the spot when a user triggers the notification. An alternative is to generate the message when a user visits the page. However, this would decrease the performance slightly for many users and each notification, and it would be difficult to send the notification to any other destination, like email or with push notifications.
Therefore, the best option is the process the messages in a background process where the heavy lifting of generating the messages do not affect the performance of users. For a Drupal distribution, where Drupal site builders are not used to run tasks in the background, the logical place was to do all the heavy lifting in CRON jobs. However, there are issues when using the CRON, mainly when not using separate machines to process the jobs.
So for my Symfony 4 applications, I wanted to have a better solution that would play well with the API Platform solution. For example, I have an API application build around FFMPEG for processing videos. I have found a solution that works well in the form of the Messenger component in combination with RabbitMQ. However, the documentation is quite technical and in-depth, and I hope this article helps people get started with asynchronous messaging in Symfony 4.
The tutorial starts here
You can follow along with the tutorial by this step-to-step guide. For every step, there is a GIT commit in the nielsvandermolen/example-symfony-messenger repository.
Step 1. Setup a basic Symfony 4 project with Docker (45f0b8d).
Step 2. Create the RabbitMQ Docker container (7b29d70).
Step 3. Setup the Messenger Component (e5a7128).
Step 4. Create a Message (c532c6d).
Step 5. Taking a look into RabbitMQ (b41bf9d).
Step 5. Consuming the messages in PHP (480cb2c).
Step 1. Setup a basic Symfony 4 project with Docker
The power of Docker is clear in this article, where we need to make use of more tools than just a PHP server. You can run these commands to get a basic Symfony 4 skeleton application started based on NGINX, PHP-FPM, and MariaDB.
1 2 3 4 5 6 | git clone git@github.com:nielsvandermolen/example-symfony-messenger.git cd example-symfony-messenger git checkout -b start 45f0b8df038736edd3ef7c9db1bbdb227f3e7b7b docker-compose up -d docker exec -it example-symfony-messenger_php_1 bash composer install |
You should now be able to visit the application on port 8001 of your Docker machine, e.g. localhost:8001.
Step 2. Create the RabbitMQ Docker container
By the default setup, the Messenger component does not handle messages asynchronous but processes the messages directly when they are dispatched. Without going into the technical details, we need a messaging broker which stores the messages for us and provides a connection with the PHP application, for the broker we use RabbitMQ. The transport protocol used for this is AMQP.
The AMQP architecture allows for much more complex enterprise applications than what we use in this tutorial (see this video for an example). We use a single PHP application that acts as the sender and receiver of the messages, but it is good to be aware that the AMQP protocol can scale to more complex implementations.
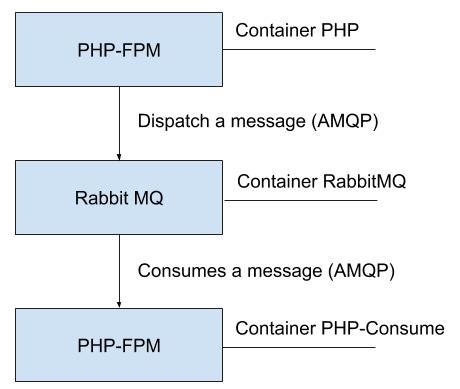
Figure 1, high level architecture
Figure 1. displays the architecture which we use. We have two PHP containers that use RabbitMQ to exchange messages. To execute the RabbitMQ container, we need to create a new Docker image.
First, let’s create the Dockerfile-rabbitmq:
1 | FROM rabbitmq:3 |
Then, add the container info to the docker-compose.yml file:
1 2 3 4 5 6 7 8 9 10 11 12 13 14 15 | services: ... rabbitmq: # The RabbitMQ container. build: context: . dockerfile: Dockerfile-rabbitmq volumes: - rabbitmq:/var/lib/rabbitmq:cached networks: - symfony volumes: symfony_db: rabbit_mq: ... |
Let’s build the Docker image and launch the Docker container.
1 2 3 | docker-compose build rabbitmq docker-compose up -d docker ps |
There should be a container named example-symfony-messenger_rabbitmq_1 which we can use at a later time.
Step 3. Setup the Messenger Component
First, we need to enable the AMQP PHP extension in the PHP Docker image to be able to dispatch messages. Let’s alter the Dockerfile-php file:
1 2 3 4 5 6 7 8 9 10 11 12 13 14 15 | FROM php:fpm RUN apt-get update && apt-get install -y --no-install-recommends \ git \ zlib1g-dev \ libxml2-dev \ librabbitmq-dev \ && docker-php-ext-install \ pdo_mysql \ zip \ && pecl install amqp \ && docker-php-ext-enable amqp RUN curl -sS https://getcomposer.org/installer | php && mv composer.phar /usr/local/bin/composer COPY project/ /var/www/project WORKDIR /var/www/project/ |
We added the lines:
1 2 3 4 5 6 7 | ... RUN apt-get update && apt-get install -y --no-install-recommends \ ... librabbitmq-dev \ ... && pecl install amqp \ && docker-php-ext-enable amqp |
After building the Docker image and creating a new container we can install the Messenger component and the AMQP pack to the Symfony 4 application:
1 2 3 4 | docker-compose build php docker-compose up -d docker exec -it example-symfony-messenger_php_1 bash composer req messenger amqp |
This should install the required components. We do still have to point the application to the correct AMQP transport.
Go to config/packages/messenger.yaml and uncomment:
1 | amqp: '%env(MESSENGER_TRANSPORT_DSN)%' |
Now, go to the docker-compose.yml file and add the enviornment variable to the PHP container:
1 2 3 4 5 6 7 8 | ... services: php: ... environment: ... - MESSENGER_TRANSPORT_DSN=amqp://guest:guest@rabbitmq:5672/%2f/messages # AMQP connection string ... |
For the environment variable to be set we need to re-create the Docker container:
1 | docker-compose up -d |
We are now ready to create or the first message.
Step 4. Create a Message
A Message stores information and the Message Handler processes the Message. The message gets triggered by a controller.
Message object:
1 2 3 4 5 6 7 8 9 10 11 12 13 14 15 16 17 18 19 20 21 22 23 24 25 26 27 | <?php # project/src/Message/SleepMessage.php namespace App\Message; class SleepMessage { private $seconds; private $output; public function __construct(int $seconds, string $output) { $this->seconds = $seconds; $this->output = $output; } public function getSeconds() { return $this->seconds; } public function getOutput() { return $this->output; } } |
MessageHandler:
1 2 3 4 5 6 7 8 9 10 11 12 13 14 15 16 17 18 19 20 21 | <?php # project/src/MessageHandler/SleepMessageHandler.php namespace App\MessageHandler; use App\Message\SleepMessage; use Symfony\Component\Messenger\Handler\MessageHandlerInterface; class SleepMessageHandler implements MessageHandlerInterface { public function __invoke(SleepMessage $sleepMessage) { $seconds = $sleepMessage->getSeconds(); $output = $sleepMessage->getOutput(); # Simulate a long running process. sleep($seconds); echo $output; } } |
We will create the message in a controller:
1 2 3 4 5 6 7 8 9 10 11 12 13 14 15 16 17 18 19 20 21 22 | <?php # project/src/Controller/SleepController.php namespace App\Controller; use App\Message\SleepMessage; use Symfony\Bundle\FrameworkBundle\Controller\AbstractController; use Symfony\Component\HttpFoundation\Response; use Symfony\Component\Messenger\MessageBusInterface; use Symfony\Component\Routing\Annotation\Route; class SleepController extends AbstractController { /** * @Route(name="sleep", path="sleep") */ public function processVideo(MessageBusInterface $bus) { $bus->dispatch(new SleepMessage(10, 'Hello World')); return new Response('<html><body>OK.</body></html>'); } } |
When you go to the sleep route, e.g. localhost:8001/sleep you should see the page load for 10 seconds before displaying the message “Hello WorldOK.”. The cause of this behavior is because the default method to handle messages is synchronous for a message.
Go to the messenger.yaml config and configure the message to use AMQP:
Go to config/packages/messenger.yaml and add:
1 2 3 4 5 6 | framework: messenger: ... routing: # Route your messages to the transports 'App\Message\SleepMessage': amqp |
When you go to the route, the response should be an instant “OK”. So let’s explore what is going on.
Step 5. Taking a look into RabbitMQ
Let’s see what is going on by going to the RabbitMQ container:
1 | docker exec -it example-symfony-messenger_rabbitmq_1 bash |
We can now make use of the RabbitMQ command line tool (rabbitmqctl) to debug the message. We can see that a RabbitMQ message exists in the queue by running:
1 2 3 4 | root@e352627a0f1c:/# rabbitmqctl list_queues Timeout: 60.0 seconds ... Listing queues for vhost / ... messages 1 |
You can empty the queue by running: “rabbitmqctl purge-queue messages”.
To be able to use the management interface of RabbitMQ we need to change the Dockerfile-rabbitmq to:
1 | FROM rabbitmq:3-management |
and expose the port in the docker-compose file:
1 2 3 4 5 6 7 8 | ... services: ... rabbitmq: ... ports: - 15672:15672 ... |
also, rebuild the Docker image:
1 2 | docker-compose build rabbitmq docker-compose up -d |
Then, you can access the RabbitMQ management interface in port 15672. The credentials are guest: guest. You can look at the Queue tab to see how many messages there are. There is also some visual feedback about how fast the messages are processed.
Step 6. Consuming the messages in PHP.
To manually consume the messages go into the PHP container and run:
1 2 | root@f69eefeae847:/var/www/project# ./bin/console messenger:consume-messages Hello WorldHello World |
There should be a delay of 10s before Hello World is displayed. Note that the command does not close. When going to the sleep route, it should trigger another Hello World. The messages should be removed from the RabbitMQ queue after they are consumed. Now, close the command (Control + C).
To automate the consumption of messages, we can create another Docker container.
First, we create a new Dockerfile named Dockerfile-php-consume:
1 2 3 4 5 6 7 8 9 10 11 12 13 14 15 16 17 | FROM php:fpm RUN apt-get update && apt-get install -y --no-install-recommends \ git \ zlib1g-dev \ libxml2-dev \ librabbitmq-dev \ && docker-php-ext-install \ pdo_mysql \ zip \ && pecl install amqp \ && docker-php-ext-enable amqp RUN curl -sS https://getcomposer.org/installer | php && mv composer.phar /usr/local/bin/composer COPY project/ /var/www/project COPY build/php-consume/ /var/www/scripts/ WORKDIR /var/www/project/ ENTRYPOINT ["bash", "/var/www/scripts/message_script.sh"] |
Then, we add the script that consumes the messages in build/php-consume/message_script.sh:
1 2 3 | #!/usr/bin/env bash sleep 10; /var/www/project/bin/console messenger:consume-messages >&1; |
Finally, we add the container to the docker-compose.yml file:
1 2 3 4 5 6 7 8 9 10 11 12 13 14 | services ... php-consume: build: context: . dockerfile: Dockerfile-php-consume environment: - DATABASE_URL=mysql://root:root@db:3306/project_db - MESSENGER_TRANSPORT_DSN=amqp://guest:guest@rabbitmq:5672/%2f/messages volumes: - ./project/:/var/www/project/ networks: - symfony ... |
Launch the new container and see how the messages are handled automatically in the Docker container.
1 2 | docker-compose up -d docker logs -f example-symfony-messenger_php-consume_1 |
You should see the message being processed everytime you go to the sleep route.
Discussion
Good job, you made it to the end of the tutorial. You should now have a better grasp on how to use the Messenger component with RabbitMQ. If you liked this article consider sharing it with your peers, giving it a comment or by supporting this blog directly.


13 Comments
Christian · March 10, 2019 at 4:11 pm
Thanks for the this easy to understand Tutorial 🙂
Maxime · March 11, 2019 at 1:07 pm
Merci ! thank you !
maxime · March 20, 2019 at 11:01 am
Hello, could you tell me why are we forced to create a second php container? Could we not run the cmd in our existing container?
nielsvandermolen · March 29, 2019 at 3:14 pm
The main reason is scalability and performance. You probably want to run the consumption containers on more powerful machines without affecting the performance of the web server.
maxime · April 8, 2019 at 1:21 pm
Thx ! i agree !
Ducho · March 28, 2019 at 5:43 pm
Nice!
But what about queues? I have problem with creating more than one queue.
nielsvandermolen · March 29, 2019 at 3:26 pm
I have no experience in using multiple queues. When looking at the documentation a solution could be to create a custom transporter based on the amqp transport.
https://symfony.com/doc/current/messenger.html#transports
https://github.com/symfony/messenger/tree/master/Transport
Guest · April 21, 2019 at 9:37 am
Increase font size in examples. 9px it way too small, even on my 24″ 1920×1080.
ggg · May 15, 2019 at 10:51 am
docker-compose up –build
Building letsencrypt
Step 1/12 : FROM alpine:3.5 AS stage1
—> eec2d71b4945
…
checking for libzip… not found
configure: error: Please reinstall the libzip distribution
ERROR: Service ‘php-consume’ failed to build: The command ‘/bin/sh -c apt-get update && apt-get install -y –no-install-recommends git zlib1g-dev libxml2-dev librabbitmq-dev && docker-php-ext-install pdo_mysql zip && pecl install amqp && docker-php-ext-enable amqp’ returned a non-zero code: 1
nielsvandermolen · May 15, 2019 at 1:36 pm
Please try the solution in this comment:
https://github.com/nielsvandermolen/example-symfony-messenger/issues/1
greg · May 15, 2019 at 11:04 am
This way run consumer ass root, so files created by consumer has root permissions, what is best way to use www-data user not root
Laïla ATRMOUH · September 25, 2020 at 12:46 pm
Thank you so much for this tutorial !
Everything is so well explained, I have a good understanding now of Symfony Messenger thanks to you ! You made my day 🙂
Cheers,
L
Cédric · December 9, 2021 at 9:14 am
Thanks for this great tutorial.
Just an up to date information.
As of Symfony 4.3, the consume command changed.
Instead of using
/var/www/project/bin/console messenger:consume-messages >&1
you should use
/var/www/project/bin/console messenger:consume >&1