This article should be useful for people that want to build their continuous integration system with Jenkins or those who are evaluating the option. We show in an example of a Jenkinsfile where we build a Symfony application with Composer, execute PHPUnit tests and how we pushed the Docker images to a custom repository. Furthermore, we show how we execute the pipeline on a Docker Swarm cluster with a custom Jenkins agent. The reason for writing this article is because I had a hard time to find this sort of documentation on the web and I think it can benefit some people. As it is not an introductory article, it is not useful for everyone.
Jenkins versus alternatives
There have been many strong alternatives for Jenkins that developed in the last period that outsources your build pipeline. Travis CI, Shippable, and CircleCI seem to be the biggest players. As they offered a better user experience, many projects outsourced their continuous integration builds to one of these platforms.
The main benefits compared to Jenkins were these:
- Easy to start and set-up with a GitHub or Bitbucket account
- Build and test steps located in a file in the repository (e.g. travis.yml)
- Test feedback works out of the box to your GitHub and Bitbucket repositories and with email notifications.
- Every commit / PR is tested making it easy to force a workflow that the tests have to pass before merging to the trunk (master)
- No maintenance burden
Outsourcing your continuous integration to one of these platforms is still a good option when you have a small team or project. Especially, when you do not maintain your hosting and deployments, e.g., with a Platform as a Service (PaaS) platform. However, when you do want to automate not only your testing but also your deployments you quickly run into the limits of these platforms. Furthermore, the costs of these platforms increase when you want to do more automated testing which could be a dangerous incentive for writing and executing tests.
Where is Jenkins now
The Jenkins project did catch up to the platforms with making Pipelines a first-class citizen in Jenkins and the introduction of a Jenkinsfile. When there is already in-house knowledge available on how to set up your infrastructure it makes sense to set-up your continuous integration in Jenkins. The main benefits are:
- Full control on how to set-up your build jobs
- Saving costs especially when your continuous integration needs to scale
- Great starting point to automate your deployments with integration, performance and user acceptance tests in a continuous delivery pipeline (more on this in a later article)
However, with Jenkins, there are still maintenance and set-up costs, but when you are running a Docker Swarm, these costs are worth the flexibility you gain. In the rest of this article, we try to reduce the costs even further by showing how our build works and the lessons learned by building it.
The Jenkinsfile
This is an example of a Jenkinsfile used for a project with a similar structure of the Symfony API Platform application:
1 2 3 4 5 6 7 8 9 10 11 12 13 14 15 16 17 18 19 20 21 22 23 24 25 26 27 28 29 30 31 32 33 34 35 36 37 38 39 40 41 42 43 44 45 46 47 48 49 50 51 52 53 54 55 56 57 58 59 60 61 62 | pipeline { agent { label 'docker' } triggers { bitbucketPush() } environment { // Specify your environment variables. APP_VERSION = '1' } stages { stage('Build') { steps { // Print all the environment variables. sh 'printenv' sh 'echo $GIT_BRANCH' sh 'echo $GIT_COMMIT' echo 'Install non-dev composer packages and test a symfony cache clear' sh 'docker-compose -f build.yml up --exit-code-from fpm_build --remove-orphans fpm_build' echo 'Building the docker images with the current git commit' sh 'docker build -f Dockerfile-php-production -t registry.example.com/symfony_project_fpm:$GIT_COMMIT .' sh 'docker build -f Dockerfile-nginx -t registry.example.com/symfony_project_nginx:$GIT_COMMIT .' sh 'docker build -f Dockerfile-db -t registry.example.com/symfony_project_db:$GIT_COMMIT .' } } stage('Test') { steps { echo 'PHP Unit tests' sh 'docker-compose -f test.yml up -d --build --remove-orphans' sh 'sleep 5' sh 'docker-compose -f test.yml exec -T fpm_test bash build/php_unit.sh' } } stage('Push') { when { branch 'master' } steps { echo 'Deploying docker images' sh 'docker tag registry.example.com/symfony_project_fpm:$GIT_COMMIT registry.example.com/symfony_project_fpm:$APP_VERSION' sh 'docker tag registry.example.com/symfony_project_fpm:$GIT_COMMIT registry.example.com/symfony_project_fpm:latest' sh 'docker push registry.example.com/symfony_project_fpm:$APP_VERSION' sh 'docker push registry.example.com/symfony_project_fpm:latest' sh 'docker tag registry.example.com/symfony_project_nginx:$GIT_COMMIT registry.example.com/symfony_project_nginx:$APP_VERSION' sh 'docker tag registry.example.com/symfony_project_nginx:$GIT_COMMIT registry.example.com/symfony_project_nginx:latest' sh 'docker push registry.example.com/symfony_project_nginx:$APP_VERSION' sh 'docker push registry.example.com/symfony_project_nginx:latest' sh 'docker tag registry.example.com/symfony_project_db:$GIT_COMMIT registry.example.com/symfony_project_db:$APP_VERSION' sh 'docker tag registry.example.com/symfony_project_db:$GIT_COMMIT registry.example.com/symfony_project_db:latest' sh 'docker push registry.example.com/symfony_project_db:$APP_VERSION' sh 'docker push registry.example.com/symfony_project_db:latest' } } } post { always { // Always cleanup after the build. sh 'docker-compose -f build.yml down' sh 'docker-compose -f test.yml down' sh 'rm .env' } } } |
The build stage
We first build the project with Composer:
1 | sh 'docker-compose -f build.yml up --exit-code-from fpm_build --remove-orphans fpm_build' |
using a build.yml docker-compose file.
1 2 3 4 5 6 7 8 9 10 11 12 | version: "3" services: fpm_build: build: context: . dockerfile: Dockerfile-php command: ["composer", "install", "--no-dev"] environment: - APP_ENV=prod volumes: - ./project/:/var/www/project |
When the Composer build is successful, the ./project/ folder should contain the production code. Then we can build the Docker image for production, which does not need Composer, with:
1 | sh 'docker build -f Dockerfile-php-production -t registry.example.com/symfony_project_fpm:$GIT_COMMIT .' |
In the Dockerfile-php-production file we copy the code of the /project folder:
1 2 3 4 5 6 7 8 9 10 | FROM php:7-fpm-alpine RUN apk add --no-cache \ zlib-dev \ libxml2-dev \ && docker-php-ext-install \ pdo_mysql \ soap \ zip COPY ./project /var/www/project WORKDIR /var/www/project/ |
The results are Docker images for a custom Docker repository tagged with the Git commit hash.
The test stage
When the build stage is successful the test stage start. Here we will execute the PHPUnit tests:
1 2 | sh 'docker-compose -f test.yml up -d --build --remove-orphans' sh 'docker-compose -f test.yml exec -T fpm_test bash build/php_unit.sh' |
We do need Composer in the PHP-FPM container to install PHPUnit. Furthermore, we do need a database for the functional tests. Here is the test.yml file:
1 2 3 4 5 6 7 8 9 10 11 12 13 14 15 16 17 18 19 | version: "3" services: fpm_test: build: context: . dockerfile: Dockerfile-php networks: - symfony db: image: mariadb:10 environment: - MYSQL_ROOT_PASSWORD=root networks: - symfony networks: symfony: |
Make sure that the correct database connection is put in the .env.dist file:
1 | DATABASE_URL=mysql://root:root@db:3306/projects |
When the containers are running we will execute this script in the fpm container which should run the tests:
1 2 3 4 5 6 7 8 | #!/usr/bin/env bash cd /var/www/project; composer install; ./bin/console doctrine:database:create; ./bin/console doctrine:schema:update --force; ./bin/console doctrine:fixtures:load -n; ./bin/phpunit; exit $? |
The push stage
Now that the tests passed we can push the Docker images (deployable artifacts) to the Docker repository. We only do so when we are at the master branch. Note, this condition only works in this way when you use a “Multibranch Pipeline” job in Jenkins. We tag the Docker images with the APP version specified in the environment section. Furthermore, we add the latest tag to the images. We do not rebuild the images in this stage but use the images build in the build stage.
Discussion about the build
That is how far our build has developed for now. Now, with the Docker images pushed it should be easy to deploy or update a new environment with the new versions. Furthermore, this should give us a good base for automated deployments and more extensive integration and performance tests. The rest of the article is about how we set-up the Jenkins environment in Docker Swarm, which is probably not interesting for people that do not (want to) work with Jenkins in Docker.
Installing Jenkins in a Docker Swarm
It is easy to install the Jenkins server with Docker, but it is more difficult to set up the Jenkins build agents (or slaves). Which is an important step because of that the Jenkins architecture expect agents to execute the build. You can execute builds on the main server, but it is not the recommended option.
We make use of the Jenkins Swarm Plugin. It is good to note that this uses a different Jenkins client than the official Jenkins slave image that it on the Docker Hub. Therefore, we can not reuse that image.
This set-up works with a Docker Swarm cluster, but it should be fairly easy to make this work with Docker Compose. For example, only Docker services have support for Docker secrets. The jenkins.yml file below is the set-up for our containers which we deploy on our Docker Swarm cluster:
1 2 3 4 5 6 7 8 9 10 11 12 13 14 15 16 17 18 19 20 21 22 23 24 25 26 27 28 29 30 31 | # jenkins.yml version: "3.5" services: jenkins: image: jenkins/jenkins:lts volumes: - jenkins_home:/var/jenkins_home networks: - jenkins jenkins-agent: build: . image: registry.example.com/jenkins-agent volumes: - /var/run/docker.sock:/var/run/docker.sock - /tmp/jenkins:/tmp/jenkins secrets: - jenkins-password networks: - jenkins secrets: jenkins-password: external: true volumes: jenkins_home: networks: jenkins: |
The Dockerfile for the Jenkins agent:
1 2 3 4 5 6 7 8 9 10 11 12 | # Dockerfile FROM docker:stable ENV SWARM_CLIENT_VERSION="3.9" RUN adduser -G root -D jenkins && \ apk --update --no-cache add openjdk8-jre python py-pip git openssh ca-certificates openssl && \ wget -O swarm-client.jar -q https://repo.jenkins-ci.org/releases/org/jenkins-ci/plugins/swarm-client/${SWARM_CLIENT_VERSION}/swarm-client-${SWARM_CLIENT_VERSION}.jar -P /home/jenkins/ && \ pip install docker-compose COPY jenkins-slave /usr/local/bin/jenkins-slave RUN chmod +x /usr/local/bin/jenkins-slave ENTRYPOINT ["jenkins-slave"] |
When the Docker container is created it will run the following script that will start the java process:
1 2 3 4 5 6 7 8 9 10 | # jenkins-slave #!/usr/bin/env sh LABELS="${LABELS:-docker}" EXECUTORS="${EXECUTORS:-3}" FSROOT="${FSROOT:-/tmp/jenkins}" HOSTNAME=http://jenkins:8080 USERNAME="${USERNAME:-admin}" PASSWORD=$(cat /run/secrets/jenkins-password) java -jar swarm-client.jar -labels=$LABELS -executors=$EXECUTORS -fsroot=/tmp/jenkins -name=docker-$(hostname) -master $HOSTNAME -username $USERNAME -password $PASSWORD |
We connect the Jenkins agent with the Jenkins server by using a username and password of a Jenkins user. This method differs from how other Jenkins slave connects. In order to make it secure we have to utilize Docker secrets. You can create a secret by going on the Docker swarm and executing:
1 | echo "admin-password" | docker secret create jenkins-password - |
Then the secret should be stored in /run/secrets/jenkins-password if you deploy the stack in the jenkins.yml file:
1 | docker stack deploy -c jenkins.yml JENKINS |
Jenkins server set-up
When setting up the Jenkins server, you have to install the Swarm plugin with the name: “Self-Organizing Swarm Plug-in Modules”. After restarting Jenkins, you should see the that the Jenkins server connects to the Jenkins agent:
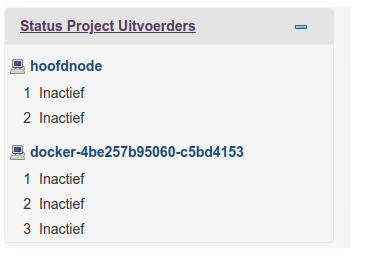
Now, the Jenkins should be ready to execute the build. You can create a Multibranch pipeline job and connect it to the Git repository and the Jenkinsfile. You can add some automatic triggers (e.g., when pushed to Bitbucket or periodically) or trigger the build manually.
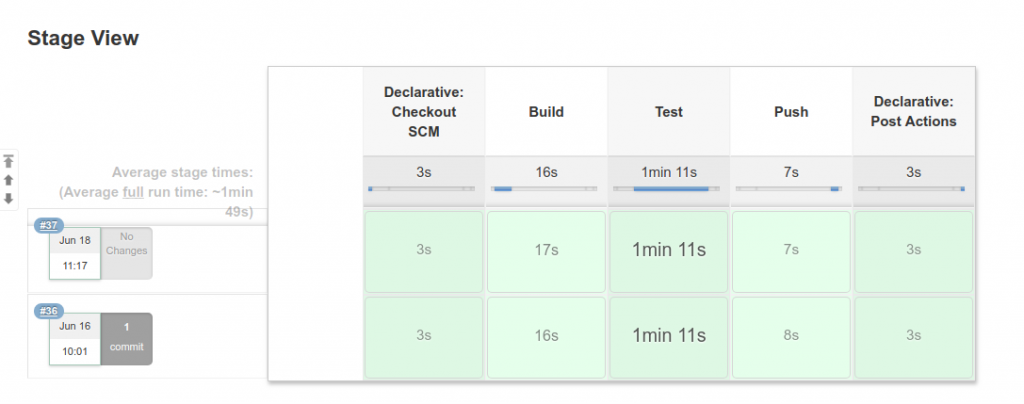
Jenkins pipeline
Discussion
You have seen how to set-up your own Jenkins continuous integration pipeline for a Symfony application. It should now be easy to add a Jenkinsfile to your repository and create a new build on your Docker Swarm cluster. We used a Symfony example as the example, but you should be able to use this knowledge any other technology stack which you can build and test automatically. This article touched many concepts but it was not comprehensive, we did not discuss how you can set-up your Docker repository or connect to the Jenkins server with a proxy. If there is a need for such articles, please let me know.
If you like this article, please consider sharing it with your peers, giving a like or a comment, or to
4 Comments
Ji Zhang · November 4, 2018 at 5:06 pm
Excellent Tutorial, Excellent, Excellent .
thank you
nielsvandermolen · November 5, 2018 at 8:51 am
Thanks for the nice comment Ji!
Ricardo · November 8, 2018 at 5:37 am
Well, at real world, we need to set composer to use cache, instead of download all dependencies over and over again. How do you manage this?
nielsvandermolen · November 8, 2018 at 10:02 am
The normal composer workflow is to commit the composer.lock file. Which should contain all download locations making the install command quite fast. However, if you do want to use the Composer cache system you could try creating a Docker volume out of the cache directory. Never done this before but it seems to be in ~/.composer/cache
https://stackoverflow.com/questions/22700728/composer-loading-from-cache
So something like this could work (build.yml):
version: “3”
services:
fpm_build:
build:
context: .
dockerfile: Dockerfile-php
command: [“composer”, “install”, “–no-dev”]
environment:
– APP_ENV=prod
volumes:
– ./project/:/var/www/project
– composer_cache: /root/.composer/cache
volumes:
– composer_cache: