In this article, we see how our team implemented pathfinding in the Unreal Engine 4 for the upcoming tower defense game MassMonsterMaze. Besides using the default navigation meshes of the Unreal engine we implemented an A* algorithm in blueprints and a connected components (island detection) algorithm in C++. The hope is that the article gives a headstart to other game developers trying to implement pathfinding in their projects.
The use case
In our game, the users are free to place towers anywhere on the map instead of dedicated build spots picked by us. This allows users to build their own maze. But this creates a problem: what happens when a user tries to build in a spot that blocks the maze so enemy units no longer have a route to the next waypoint? By default, all enemies stop walking and the game is bugged:
There are different ways to solve it:
- Enemies would go berserk and destroy the towers
- They would jump/fly over towers
- It would not be possible to build the tower
We decided to go for the last option since it is the most easiest to create and understand.
A* Pathfinding introduction
The initial solution was based on finding the shortest path with the A* search algorithm. Based on the distance between the begin point and endpoint you can calculate a score for a tile in a grid, recursively you can follow the best scoring tile which mathematically will give you the path in the shortest number of tries and preventing the algorithm from having to calculate the score for every tile in the grid. The video below gives a good visual introduction:
The main workflow of this project is to create everything in blueprints until we hit performance issues. Then we convert a working solution to C++ code to optimize for performance. The A* algorithm has not been converted to C++ yet because of the alternative solution of connected components.
Creating the grid
Before we can do any work on the custom pathfinding logic we first have to convert the Unreal map to a grid. Our towers currently all have an equal size of 100 x 100 Unreal units. All maps have a single navigation mesh bounds volume which enemies use for the pathfinding. We will not alter this pathfinding because it is already very performant. However, we can reuse the size of the navmesh to calculate a custom grid.
Now that we have a strategy, we should think about where to put this logic. We decided on a custom actor component (CustomAIComponent) and add it to the player controller when we initiate a game. This ensures that we can both use it at the client and at the server which is important because we have a multiplayer game.
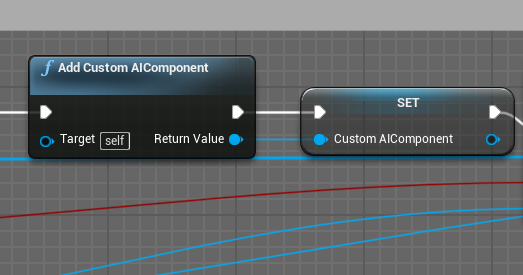
Great, with the component in place we can do some work! First, let’s calculate or grid size based on the Nav Mesh Bound in the map. GetActorBounds returns half the size of the navmesh so we have to multiply it by 2. The GridItemSize is set the 100, the size of the towers:
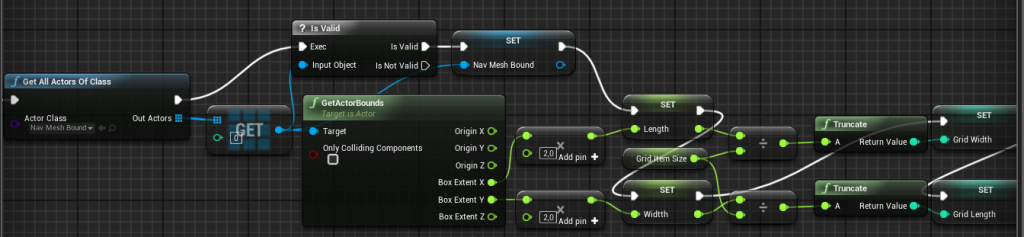
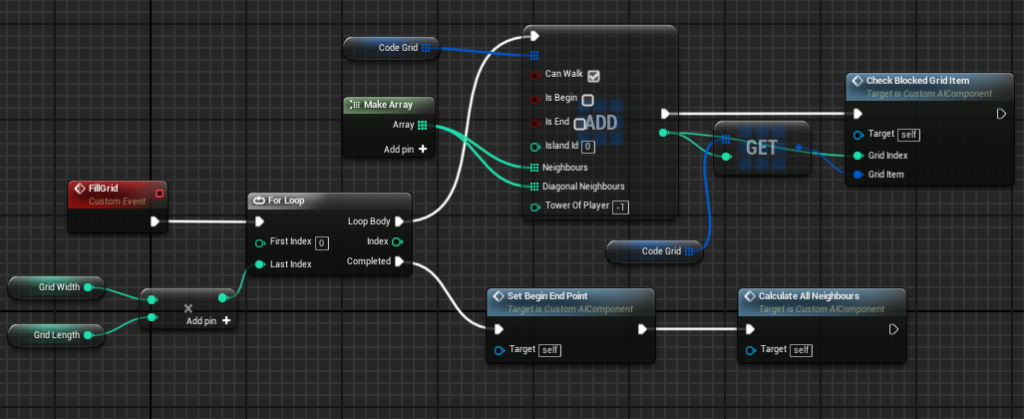
Now that we have the dimensions we can fill the grid with tiles based on the grid width and length. We create an array of GridStructures. The CheckBlockedGridItem uses a line trace to determine if enemy units can walk on the tile. We also set the start and endpoint in the grid based on another actors location and we set the neighbour tiles (used later in the pathfinding).
Phooey! That’s a lot of preparation and we did not even show half of the code (but we did show the most important parts). But, now that we have the grid we can start with working on the pathfinding!
A* Pathfinding
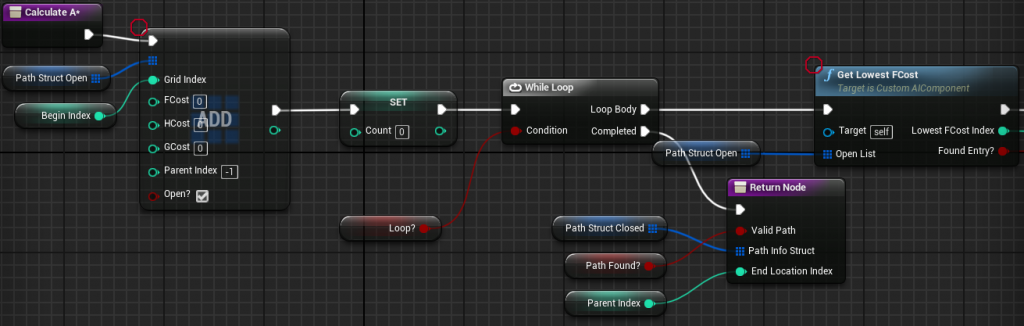
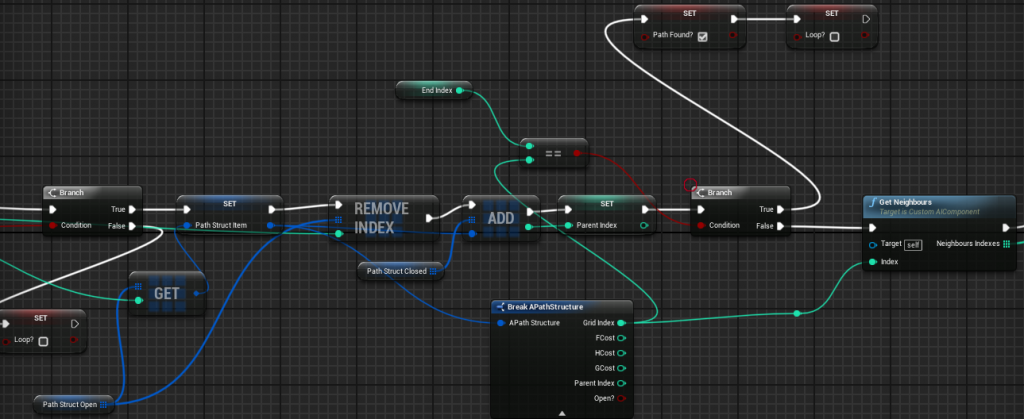
The main implementation consists of two arrays with a a*PathStructure; PathStructOpen (Open) and PathStructClosed (Closed). Our implementation goes like this:
- Add the start point to Open. Loop until a path has been found to the endpoint or all the tiles have been exhausted (e.g. no path can be found)
- Find the tile with the lowest FCost in Open (Tile X)
- Remove Tile X from Open; Add Tile X to Closed
- Set the parent index to the index of the tile in Closed
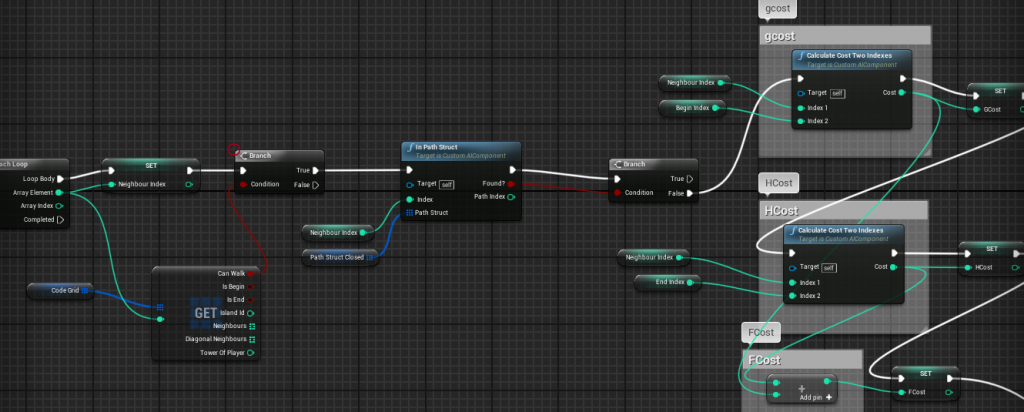
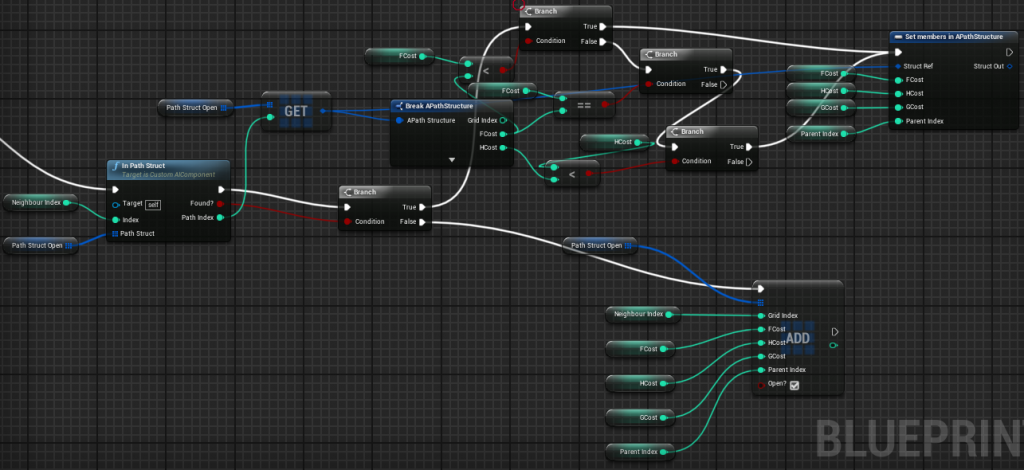
- Get the neighbours of Tile X and do the following steps for all the neighbours (Neighbour Y)
- Check that Neighbour Y is a tile which we can walk on and that it is not in Closed
- Calculate the GCost, HCost, and FCost for NeighBour Y
- If Neighbour Y is in the Open array if so update the FCost is lower with the new costs and the parent index. If the neighbour is not in the array add it to Open.
- When all neighbours have been checked go continue with the initial loop of the Open array
When a path is found you can find it by starting at the endpoint and following the parent indexes until you find the starting point.
So, let’s take a look at how it works in blueprints! Use control + scroll to zoom in and out.
Amazing! With the path, we can now display the path ingame and make sure the player can not block the enemy units. We do this by setting the tile we want to build to blocked (not canWalk) and then run the a* algorithm.
But there is one small problem..
Performance issues
The performance was great when the maze was small and when you start to check at the beginning of your maze. But when the maze became longer and longer the performance dropped to an unplayable level. Furthermore, when you blocked the maze at the endpoint it even crashed! The explanation is easy. When a path can not be found it has to do the calculation for every tile in the grid it can reach. One way to make it more performant is to write it in c++ code. However, from searching performance reasons I found this advice by amitp:
3. If the end node being blocked is a common problem, connected components (“island id”) is extremely simple and fast to implement. You preprocess the map once. Loop over each node. If it already has an island id, then skip it. If it does not have one, run breadth or depth first search from that node, and mark all visited nodes with the new island id. When you run A* you will first compare island ids. If they are different, you will know right away that there is no path. (Note: this only is useful if all edges are two-way. One-way edges complicate this.)
amitp – GameStackExchange
So the idea is that we can improve the A* performance by first running a simpler algorithm that checks if the path can be reached at all. Furthermore, this is enough to satisfy our use case to make sure the towers cannot block the path. So let’s work on the implementation! However, I learned my lesson of blueprint performance for pathfinding algorithms and started to build this in c++. Luckily, we can reuse all of the grid logic in Blueprints when using the new C++ class as the parent for the CustomAIComponent.
Connected components, island detection
This algorithm is much simpler! Let’s take a look at the code:
First, we have to add the structure to the c++ class instead of blueprints in the .h file (Adding the USTRUCT and UPROPERTY allows blueprints to set these values so all of our code still works!):
2
3
4
5
6
7
8
9
10
11
12
13
14
15
16
17
18
19
20
21
struct FCodeGridStruct {
GENERATED_BODY()
UPROPERTY(EditAnywhere, BlueprintReadWrite, Category = "Pathfinding")
bool CanWalk;
UPROPERTY(EditAnywhere, BlueprintReadWrite, Category = "Pathfinding")
bool IsBegin;
UPROPERTY(EditAnywhere, BlueprintReadWrite, Category = "Pathfinding")
bool IsEnd;
UPROPERTY(EditAnywhere, BlueprintReadWrite, Category = "Pathfinding")
int32 IslandId;
UPROPERTY(EditAnywhere, BlueprintReadWrite, Category = "Pathfinding")
TArray<int32> Neighbours;
UPROPERTY(EditAnywhere, BlueprintReadWrite, Category = "Pathfinding")
TArray<int32> DiagonalNeighbours;
UPROPERTY(EditAnywhere, BlueprintReadWrite, Category = "Pathfinding")
int32 TowerOfPlayer;
//more properties here
};
Then, the logic starts with some initialization of the code grid:
2
3
4
5
6
7
this->ProcessedIndex.Init(0, 0);
for (int i = 0; i < this->CodeGrid.Num(); i++) {
this->CodeGrid[i].IslandId = -1;
}
return ConnectedComponentCheckQuickCodeRecursive(BeginIndex, EndIndex, CheckCanWalk, CheckDiagonal);
}
Then, there is a recursive function
2
3
4
5
6
7
8
9
10
11
12
13
14
15
16
17
18
19
20
21
22
if (this->ConnectedComponentCodeProcess(BeginIndex, 0, CheckCanWalk)) {
if (BeginIndex == EndIndex) {
return true;
}
for (int i2 = 0; i2 < this->CodeGrid[BeginIndex].Neighbours.Num(); i2++) {
bool returnvalue = this->ConnectedComponentCheckQuickCodeRecursive(this->CodeGrid[BeginIndex].Neighbours[i2], EndIndex, CheckCanWalk, CheckDiagonal);
if (returnvalue) {
return true;
}
}
if (CheckDiagonal) {
for (int i2 = 0; i2 < this->CodeGrid[BeginIndex].DiagonalNeighbours.Num(); i2++) {
bool returnvalue = this->ConnectedComponentCheckQuickCodeRecursive(this->CodeGrid[BeginIndex].DiagonalNeighbours[i2], EndIndex, CheckCanWalk, CheckDiagonal);
if (returnvalue) {
return true;
}
}
}
}
return false;
}
The ConnectedComponentCodeProcess function checks if the tile is valid and sets the island id
2
3
4
5
6
7
8
9
10
11
12
13
14
15
16
{
if (this->CodeGrid.IsValidIndex(Index)) {
if ((CheckCanWalk && this->CodeGrid[Index].CanWalk) || (!CheckCanWalk && (!this->CodeGrid[Index].CanWalk || this->CodeGrid[Index].IsBegin))) {
if (!this->ProcessedIndex.Contains(Index)) {
this->ProcessedIndex.Add(Index);
this->CodeGrid[Index].IslandId = IslandID;
return true;
}
}
else {
this->CodeGrid[Index].IslandId = -1;
}
}
return false;
}
This logic is very simple and fast! All the performance issues have been solved by just using the connected components algorithm in c++ instead of the more complicated a* algorithm.
Conclusion
Now, you should have a better understanding of what it takes to build a custom pathfinding solution in the Unreal engine. We still plan to use the a* logic and probably refactor it to c++ but with connected components, we can solve all of the high priority use cases with no performance penalty. For example, to display the path is more a nice to have than a critical feature.
3 Comments
Anthony · August 17, 2019 at 5:23 am
Nice article! I’m really trying to wrap my head around what you’re doing here. The blueprints seem fragmented so it’s hard to understand where these functions live. All they all in a main blueprint? (player controller?) Would you be able to show how you did things like the line trace to see if any thing is blocking the AI’s path?
Thanks!
nielsvandermolen · August 17, 2019 at 8:54 am
Thanks! I created a custom actor component where most of the logic lives and couple it to the player controllers. When the player tries to build a tower the pathfinding check is executed. However, the initialization of the grids happens only at the construct.
The basic logic of the line trace is to derive the absolute position of the navigation mesh from the grid positions.
https://www.nielsvandermolen.com/wp-content/uploads/2019/08/grixXY.png
Then we can do a line trace (on the middle of the grid item) like so:
https://www.nielsvandermolen.com/wp-content/uploads/2019/08/linetrace.png
Isaac Gomez · May 30, 2021 at 3:25 am
im not sure where is setted the function of get grid xyz