For my new architecture with microservices and Svelte, a vital implementation detail is the authentication and authorization mechanisms. In the last article, there was an example of how to build the signup component and in this example, we take a look at sessions. The final result is basic account creation and authentication support with a JWT token for upstream services.

A quick glance at the authentication API
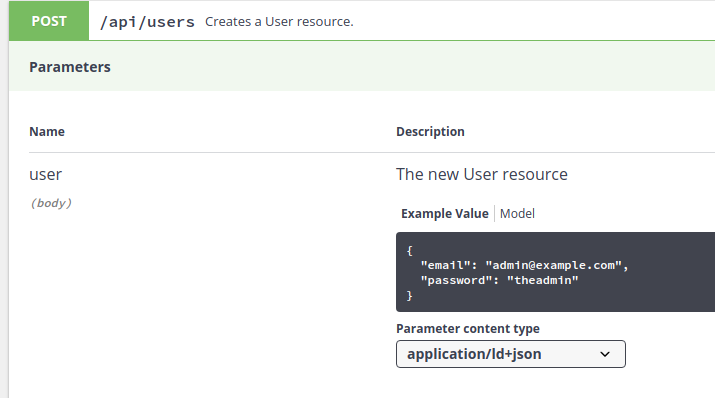
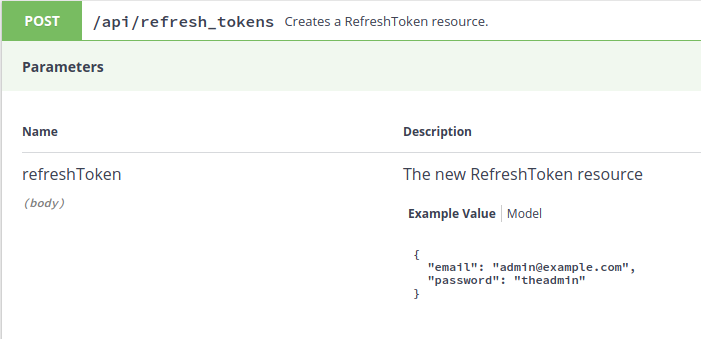
We use an external service created in API Platform (PHP / Symfony) which allows us to create users and refresh tokens based on user credentials. The refresh token is used for retrieving a JWT token. We will not discuss the details on how to build this API but it is important to understand how it works to follow the rest of the article.
Create user endpoint (signup):
Create refresh token endpoint (login):
The result of calling the endpoint successfully:
{
  "@context": "/api/contexts/RefreshToken",
  "@id": "/api/refresh_tokens/0be45846-b76d-11e9-a437-0242ac120002",
  "@type": "RefreshToken",
  "token": "028e818976e38172f47751d8fada5c6adfb897e39bf5c9ee5f6b03e65b791624752aad51dd6338f30a643e18d7f571bc7b67aabd39fc444b69f15061dc754327",
  "user": "/api/users/73b4c436-b76c-11e9-a437-0242ac120002"
}
Then we can add the token to the header to authenticate the user and call the “GET user endpoint” which generates a JWT token:
curl -X GET "http://127.0.0.1:8001/api/users/73b4c436-b76c-11e9-a437-0242ac120002" -H "accept: application/ld+json" -H "REFRESH-TOKEN: 028e818976e38172f47751d8fada5c6adfb897e39bf5c9ee5f6b03e65b791624752aad51dd6338f30a643e18d7f571bc7b67aabd39fc444b69f15061dc754327"
{
  "@context": "/api/contexts/User",
  "@id": "/api/users/73b4c436-b76c-11e9-a437-0242ac120002",
  "@type": "User",
  "id": "73b4c436-b76c-11e9-a437-0242ac120002",
  "jwttoken": "eyJ0eXAiOiJKV1QiLCJhbGciOiJSUzI1NiJ9.eyJpc3MiOiJhdXRoLm5hYWJ1LmNvbSIsImF1ZCI6Indpc3ZpZHMubmwiLCJpYXQiOjE1NjUwMDE2NTcsIm5iZiI6MTU2NTAwMTY1NywiZXhwIjoxNTY1MDAxNzc3fQ.nCXsDOphrMN_v701Ma-8RPQvoTgolEOPbN-USR-kmY0lUe-CfbBxseujnr65j5lZc6B9BBvYYPSh733FnDRKjnZqC015IcUandVfniemfAGFUl-g-rISSKuVOLBx6UEZ2CMVxnS_SroAXUujcMI-p2ASeBbySYQn00AoWPXCmyDwKqZ7AnqsDXIeuGhcGke0-OktrzpPXrV1DfhnFXJw_16m2PfmfF0VAIWyvO-X4DJBiJS039D1hXt-KripS4eXtQLdq95dSdHH61bMCMudbznhEdhymq_ADBocEzgdJiscVpHz3x_seGuNWe7W4b084pT-_UaKqeg-dDT8S_2ypA"
}
This JWT token can then be used for authentication in upstream services.
Persistent sessions in Sapper
It is important to understand that Sapper does not have native support for persistent sessions. Sapper is not a standalone framework on NodeJS but Sapper is a middleware component which can be used in almost all other NodeJS Frameworks to have server-side rendering of Svelte pages. The official documentation mentions this:
Note that you will need to use session middleware such as express-session in your app/server.js in order to maintain user sessions or do anything involving authentication.
Sapper Doc
So, we will need to use an alternative solution like express-session as we want to persist session to Redis for authentication. A popular NodeJS framework is Express and express-session is a component build for Express. The sapper template uses Polka instead of Express. Polka seems to be a bit more performant but is much less mature than Express (at least in online educational materials). The RealWorld example uses Polka with Express Sessions. However, I choose to use Express.
Here is the relevant logic in the server.js:
const app = express()

// Configures the express session.
app.use(session({
    store: new RedisStore({host: 'redis', port: 6379}),
    cookie: {
        maxAge: 604800000,
    },
    secret: 'keyboard cat',
    resave: false,
    rolling: true
}))

// Setting default values and for debugging purposes
app.use(function(req, res, next) {
    console.log(req.session.user);
    console.log(req.session.refresh_token);
    if (typeof req.session.user === 'undefined') {
        req.session.user = false;
    }
    next()
})

// Initiates Sapper and adds the session variable to the Store.
app.use(
    sapper.middleware({
        session: (req, res) => ({
            user: req.session.user
        })
    })
)
The “user” value is a boolean which is true when logged in. The session in the Sapper middleware is a Svelte Store. The user value can now be used in Svelte component to show or hide components in index.svelte:
<script context="module">
	export function preload(page, { user }) {
		return { user };
	};
</script>
<script>
	import Signup from '../components/Signup.svelte';
	import Login from '../components/Login.svelte';
	import Logout from '../components/Logout.svelte';
	import { stores } from '@sapper/app';
	const { session } = stores();

	export let user;
</script>

{#if !user}
<Signup/>
<Login/>
{:else}
<Logout/>
{/if}
Login component
First, we use a basic form component as described in the signup article. In the submit logic we call the login server route in Sapper.
<script>
    import { stores } from '@sapper/app';
    const { session } = stores();

    export let handleSubmit = async function(event) {
        if(!event.target.checkValidity()) {
            return;
        }

        const response = await fetch("/login",
        {
            method: 'POST',
            headers: {
                'Accept': 'application/json',
                'Content-Type': 'application/json'
            },
            body: JSON.stringify({email: event.target[0].value, password: event.target[1].value})
        });
        if (response.status === 201) {
             // Sets the User to true in the Store so we do not have to refresh the page.
             session.set({ user: true });
        }
    }
</script>
This will try to call the server route /login which does not exist yet. We can create it by adding a login.js file in the routes folder:
const fetch = require('node-fetch')

async function login(email, password) {
    const { AUTH_SERVICE } = process.env;
    // Calls the external refresh token create endpoint
    const response = await fetch(AUTH_SERVICE + '/api/refresh_tokens',
        {
            method: 'POST',
            headers: {
                'Accept': 'application/ld+json',
                'Content-Type': 'application/ld+json'
            },
            body: JSON.stringify({email: email, password: password})
        });

    return await response;
}

export async function post(req, res, next) {
    // Call an authenication microservice to handle the authentication.
    const { AUTH_SERVICE } = process.env;
    if (AUTH_SERVICE) {
        const response = await login(req.body.email, req.body.password)
        res.status(await response.status);
        if (response.status === 201) {
            const data = await response.json();
            req.session.user = true;
            req.session.refresh_token = data.token;
            req.session.rt_id = data["@id"];
            res.end();
        }
        ... # error handling
    }
}
We need to install node-fetch to call the external service in the server route. After a successful response which means the credentials are valid, the session is populated with a refresh token and the refresh token id.
We can now use the refresh token to get a new JWT token by suppling the refresh token in the header (not yet implemented). Furthermore, when logging we can call the delete refresh token endpoint with the refresh token in the header for authentication (logging out):
// logout.js (server route)
const fetch = require('node-fetch')

async function logout(id, refresh_token) {
    const { AUTH_SERVICE } = process.env;
    const response = await fetch(AUTH_SERVICE + id,
        {
            method: 'DELETE',
            headers: {
                'Accept': 'application/json',
                'Content-Type': 'application/json',
                // Adds the refresh token to the header.
                'REFRESH-TOKEN': refresh_token
            }
        });

    return await response;
}

export async function del(req, res, next) {
    // Call an authenication microservice to handle the authentication.
    const { AUTH_SERVICE } = process.env;

    if (AUTH_SERVICE) {
        // Here we can retrieve the information in the Session.
        const response = await logout(req.session.rt_id, req.session.refresh_token);
...
Discussion
That was quite some work to get simple authentication flow working in Svelte. However, I expect it to be a very powerful solution compared to a monolithic alternative. For example, we can reuse the same authentication service and Svelte components for different projects.
The Sapper routing acts as an API Gateway where all traffic goes through Sapper first, then the authentication of the upstream services is handled in the background. This architecture will also allow calls to multiple separate microservices in one Sapper call.
The session and store mechanic of Svelte seems very useful in where we can control what is stored on the client but we need to combine it with external tools like express-session. Also, do not forget to also change the Store in the Svelte component when changing a value server-side. Furthermore, the Sapper session logic could be more comprehensively documented for Javascript newbies like myself!
Was this article very helpful and did is save you hours of work? Please consider to


13 Comments
Jorge Klemm · August 29, 2019 at 6:09 pm
Very nice article!
I’m beggining my studies about svelte and sapper, this article helpt a lot.
Jorge Klemm · August 29, 2019 at 6:33 pm
An answer..
I’m new to node. What do you need to import to make RedisStore works?
nielsvandermolen · August 29, 2019 at 9:41 pm
I use the connect-redis package to connect to a redis server.
https://www.npmjs.com/package/connect-redis
uiytt · October 12, 2019 at 10:34 pm
I’m a complete beginner in svelte and I was wondering how to import RedisStore, because
import RedisStore from ‘connect-redis’;
does not seem to work… can anyone help ?
nielsvandermolen · October 14, 2019 at 8:54 am
See the comment above for the link to the connect-redis package
Sullivam · November 11, 2019 at 7:02 pm
Thanks for this article, very helpful!
How would you manage something like FeatherJS auth client?
I manage to authenticate on server-side like it’s done on sveltejs-realword, but I also have to access directly the API via socket.io for realtime acces.
nielsvandermolen · November 12, 2019 at 1:50 pm
Thanks,
Unfortunately, I do know nothing about FeatherJS or socket.io.
If you need direct access (client-side) access to a private API’s you have to think about security but a JWT token works quite well.
I have an article on how I connect to an external service (Stripe) with Svelte. They have publishable keys so it is not a security issue to have them in plain client-side javascript.
https://www.nielsvandermolen.com/external-javascript-sveltejs/
bluepuma · February 22, 2020 at 9:57 pm
Niels, thanks for the write up. It would be great if you could provide the full working sources for this example. Setting up the sapper template and trying to mix in some code snippets is not always fail safe 😉
acim · March 8, 2020 at 5:10 pm
Here is my solution: https://github.com/acim/sapper-auth
Salman A · March 16, 2020 at 4:07 am
No need to use “return await” you can just return a promise for an async function
enomarin · April 14, 2020 at 12:44 pm
Hi Niel,
Thank you for your tutorial, it has been very helpful !
In addition to your client-side checking method of the auth, I’d like to add the method that I’m using, for multi page applications. It easily permit to check auth on every page, not just index.svelte.
source : https://sapper.svelte.dev/docs#this_redirect
export async function preload(page, session) {
const { user } = session;
if (!user) {
return this.redirect(302, ‘welcome’);
}
return { user };
}
I’ve associated this method with a goto(‘/’) function in my Login.svelte component as described below :
import { stores } from ‘@sapper/app’
import { goto } from ‘@sapper/app’
const { session } = stores()
/…./
if (response.status === 201) {
session.set({ user: true })
goto(‘/’)
}
/…/
It work like a charm 🙂
Thank you again !
Martin · May 26, 2020 at 2:00 pm
A very interesting article.
It would be even more helpful if there was a complete app as a template. If someone only starts with Sapper, it is difficult to assign the program parts to individual files, add missing parts and also search for everything that still needs to be imported. I didn’t get the app to work.
Marcus Nordquist · December 21, 2020 at 5:44 pm
How does this work during export? Since server.js is not exported on `npx sapper export`? Do I then need to run the server separately somewhere else and how will that work given that the session store is “hooked into” the Sapper context.